After our recent interview with the legendary Dave Clarke, we found ourselves asking, ‘Why haven’t we covered his style yet?’ It’s time to change that.
Dave Clarke is an English DJ, producer, radio presenter, and photographer based in Amsterdam. Originally from the UK, he has been at the forefront of techno since breaking through with Archive One in 1995. Over the past 30 years, many have come and gone, but his star has continued to shine due to his commitment to underground techno, the associated culture, and new music. If you’re after an extended biography, this isn’t the place. It’s a testament to his influence that you’ll find plenty written about him, so let’s move on to musically dissecting his magic instead.
In this edition of Beat Dissected, we’re looking at ‘Way of Life’ from his 2003 album Devil’s Advocate, featuring Chicago house legend DJ Rush. We won’t create a carbon copy of his track, but we will explore some techniques used to come close to his legendary sound.
Here’s the original track:
And here’s what we’re making today:
Spec
Tempo
137 BPM
Swing
52%
Sounds
Ableton 12
Remember – click any image to enlarge!
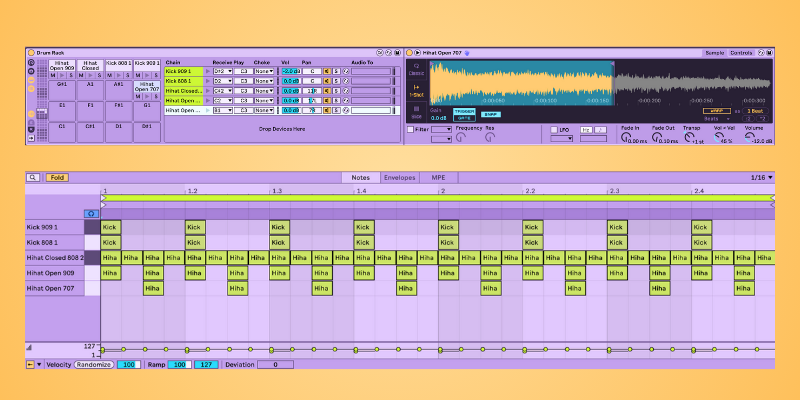
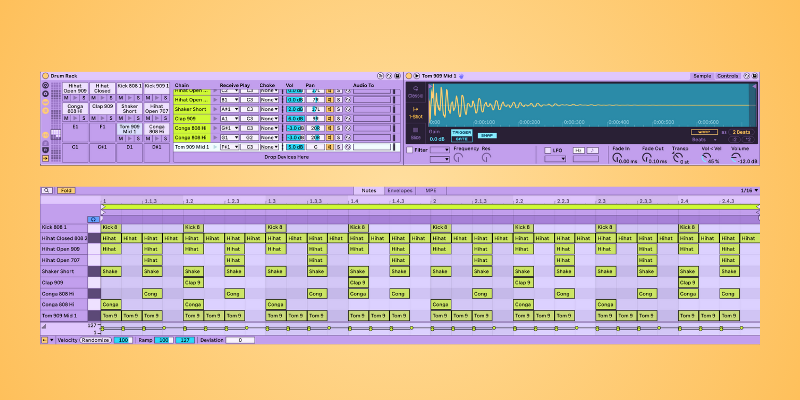
Step 1: The kicks
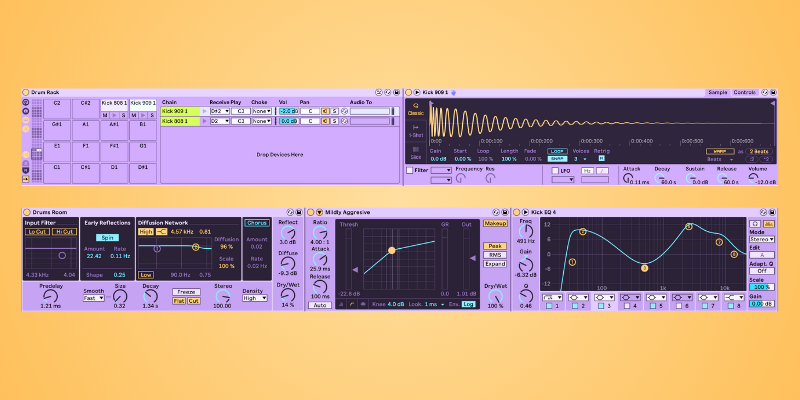
Create a new MIDI track and load in Drum Rack. From the Core Library, find and load the samples onto the Drum Rack Pads, with “Kick 909 1.aif” onto D2# and “Kick 808 Thud.wav” onto D2. The instruments will default to C3 under Play, so let’s leave them unless otherwise specified.
On both kicks, adjust Decay to 60.0 s.
Now, let’s add some effects to the 909 kick’s sample group. Load Kick EQ 4 and adjust Freq settings to 2.72 kHz on band five and 15.6 kHz on band eight. Add a bell curve filter on band seven and set it to 8.80 kHz.
Add the Mildly Aggressive compressor as-is.
To give it that pushing sound, we’re creating a longer decay or tail, with the Drums Room reverb. Adjust the settings to Predelay 1.21 ms, Size 0.32, Decay 1.34s, Diffuse -9.3 dB and Dry/Wet 14%.
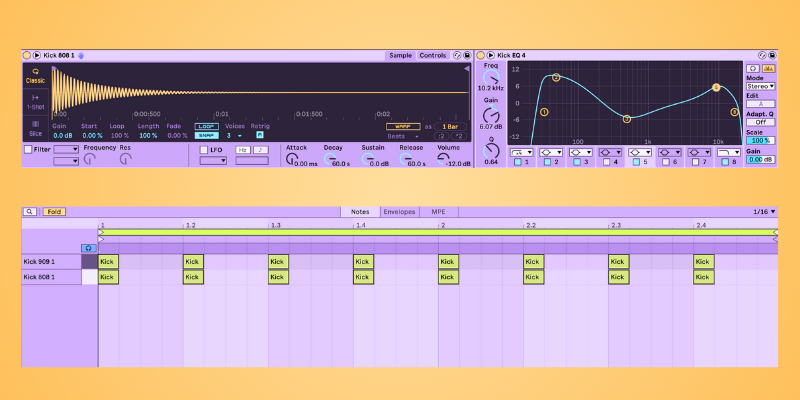
Lastly, for the 808 kick, load “Kick EQ 4” into the sample group.
Build a four-beat pattern for both kicks.
Step 2: Hi-hats
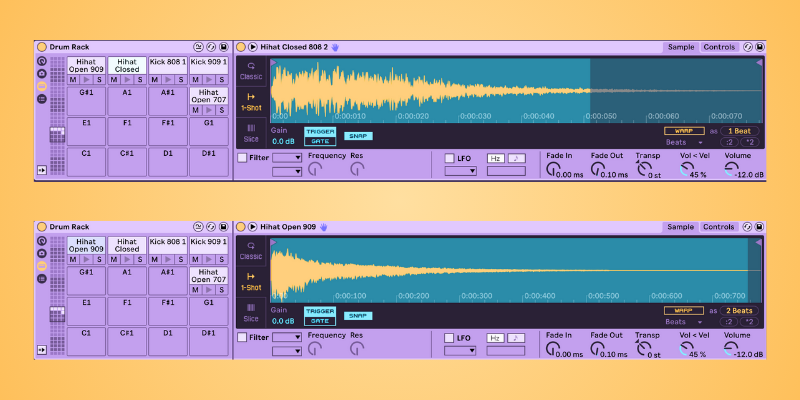
Add the samples “Hihat Closed 808 2.wav” onto C2#, “Hihat Open 909.aif” B1 and “Hihat Open 707.aif” C2 in your Drum Rack.
First let’s give our track some movement with a rolling 16 beat hi-hat by placing an 808 closed hi-hat on every step. Pan Vol to 11R.
Starting with bar one, place the 909 open hi-hat on every other bar. Pan Vol to 17R.
Next, place the offbeat 707 open hi-hat as one step on every third of a 1/4 bar as shown in the pattern. Trim the sample to about 0:00:175. Transpose to +1 st. Pan Vol to 7R.
Top Tip: This track is heavily percussive. To focus on specific instruments, use a parametric EQ Eight audio effect and adjust the filters for greater control over frequency bands. You can also select the headphone icon and click on any of the eight filters to isolate a frequency range
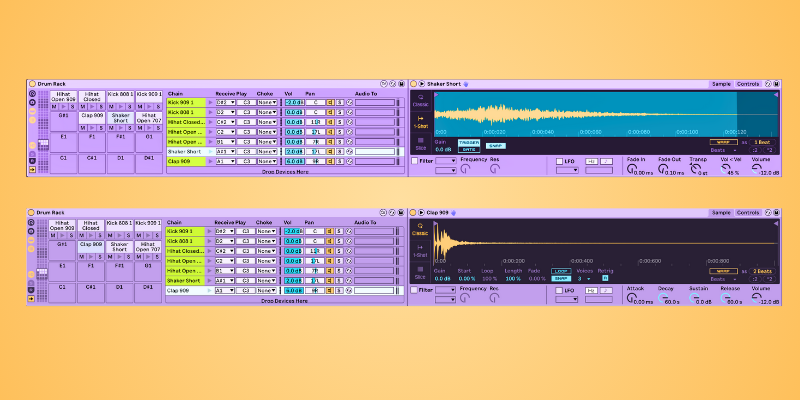
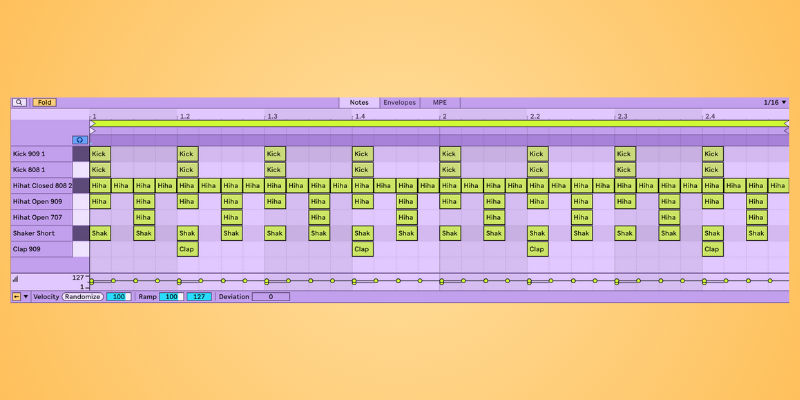
Step 3: Shaker and clap
Add the “Shaker Short” sample into A1# of the Drum Rack. Turn up the volume to 2.0 dB and pan to 17L.
Load “Clap 909.aif” into A1 of the Drum Rack. Turn the decay up to 60.0 s to give a bigger Chicago warehouse vibe. Dial up the volume to 6.0 dB to balance it into the mix.
For the shaker, we’re going to copy the 909 open hi-hat pattern from the previous step so we can layer upon it.
Now, place a clap on every fifth and thirteenth beat of the bar.
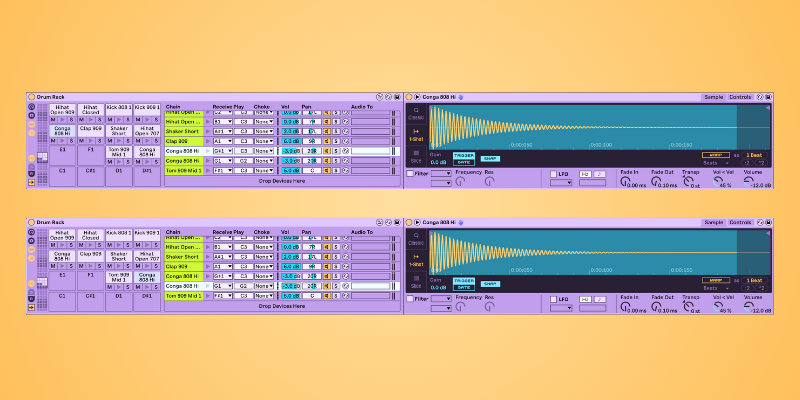
Step 4: Conga and tom
Who doesn’t love a good conga to remind us that drum machines existed before DAWs? Load the “Conga 808 Hi.aif” sample onto two Drum Rack Pads, G1# and G1.
Under Play, set the first conga to G2 and the second to C3. Pan both to 20R and set Vol to -3.0 dB.
Load “Tom 909 Mid 1.aif” onto the F1# Pad. Adjust the volume to 5.0 dB.For both congas, program in the MIDI pattern as shown.
Plug in the following steps to give it a galloping, driving feel.
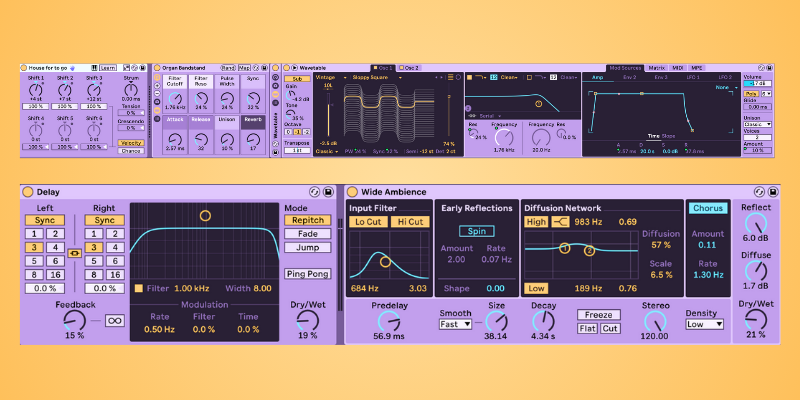
Step 5: Organ stab
Now, let’s build up our house melody with a classic organ stab by loading “Organ Bandstand.adg” into a new MIDI track. Open the Wavetable and set Transpose to 1 st.
Adjust the settings to Filter Reso 24%, Pulse Width 24%, Sync 32%, Attack 2.57 ms, Release 32 and Unison 10%. Transpose to 1 st to make the pitch higher.
Let’s load in “House for to go.adv” to the left to build our chords. Change knobs to Shift 1 +4 st, Shift 2 +7 st and Shift 3 +12 st.
Ok, let’s add the stock Delay, copy the settings and dial down Feedback to 15% and Dry/Wet to 19%.
Finally, add the Wide Ambience reverb and bring down the Dry/Wet to 21%.
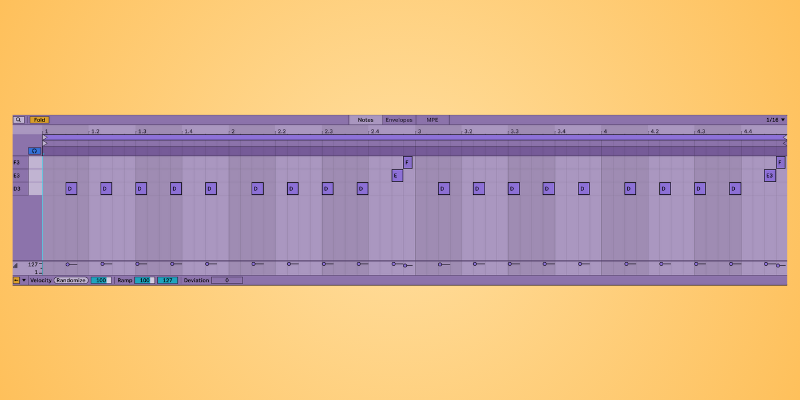
Program in the following pattern.
Step 6: Master bus processing
Before we export our master track, set the tracks as House Stab track -7.0 dB, Drum Rack -10.0 dB and Main (Master in Ableton 11 and earlier) to -6.0dB. This will give us enough headroom to prevent distortion in our master.
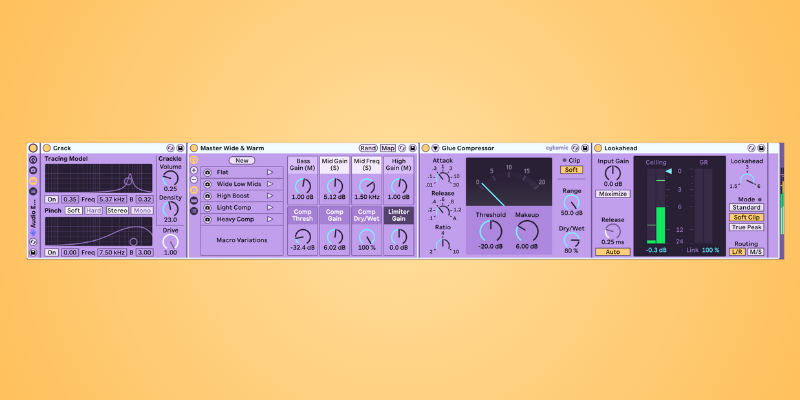
In order to build up our mastering chain and preserve the raw, DAWless (hardware only) sound of the track, let’s add the vinyl distortion “Crack.adv” to our Main channel. Set Volume to 0.25 and Density to 23.0.
Next, add Master Wide & Warm, click Heavy Comp and copy the settings to Bass Gain (M) 1.00 dB, Mid Gain (D) 5.12 dB, Mid Freq (S) 1.50 kHz, High Gain (M) 1.00 dB, Comp Thresh -32.4 dB and Comp Gain 6.02 dB.
Let’s add the Glue Compressor to give the track more of a pumping sound and manage the levels. Add the Soft Clip and set the Attack to .3, Release .4, Ratio 4, Threshold -20 dB, Makeup 6.00 dB, Range 50.0 dB and Dry/Wet 80%.
To complete our mastering chain, we will add the Lookahead limiter to prevent volume peaking and change Mode to Soft Clip. Group the effects together to have more control over the chain.