
In this Beat Dissected, we’re making a hypnotic percussive heavy techno beat inspired by Berghain resident and BITE label owner, Phase Fatale.
New York native Hayden Payne, known professionally as Phase Fatale, relocated to Berlin in 2014. He quickly established himself as a Berghain resident, captivating audiences with his intense live sets characterized by driving, tense rhythms. His distinctive sound has earned him acclaim, leading to releases on prominent labels including Berghain’s own Ostgut Ton, Aufnahme + Wiedergabe, and Jealous God, the latter founded in part by the late Silent Servant..
In today’s Beat Dissected, we highlight the incredible beat from Phase Fatale’s latest EP, “Love Is Destructive.” We won’t promise to make a direct replica, but instead, we will look at a few of the techniques deployed to create his signature sound.
Here’s what we’re making today:
And here’s how the beat sounds with melody for context:
Remember, click any image to enlarge!
Spec
Tempo
138 BPM
Swing
50%
Sounds
Ableton Live 11 Suite
Step 1: Layering the kick
Phase Fatale performs with the Roland TR-8 drum machine, a highly engaging tool for live shows. It employs analog circuitry to emulate classic Roland groove boxes like the 606, 707, 727, 808, and 909. His club tracks are known for their deep, rumbling bass, and by layering our kick, we can get close.
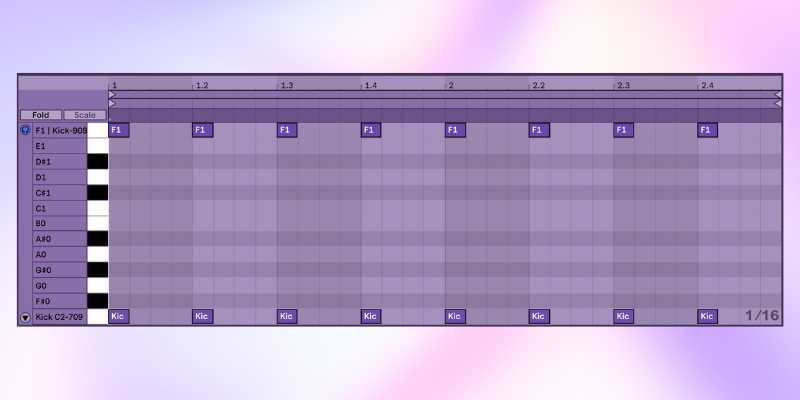
Add an empty Drum Rack to your channel and drop Kick-909.adg onto F1 and Kick C2-709.aif onto F0. Now program a four-to-the-floor pattern.
Next, we’re going to add an effects processing chain. Search for the EQ Eight, find the preset Kick EQ 4 and drop it after your Drum Rack. That way, it affects all sounds in your Drum Rack.
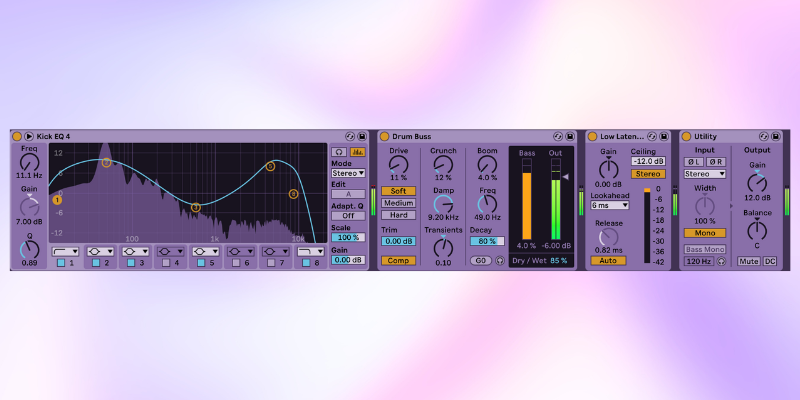
Starting with EQ Eight, change band 1’s frequency to 11.1 Hz and have the tail have a soft cut to maintain the rumbling low end. Add Drum Buss and apply the settings in the image below.
Lastly, add a Limiter after Drum Bus. Reduce the ceiling to -12 dB and increase Lookahead to 6ms to reduce distortion while preserving the transient. Set Release to 0.82 ms. You can also compensate for the Limiter’s reduction by adding Utility with 12 dB gain and selecting Mono.
💡Top Tip: Use a frequency spectrum analyzer, like Spectrum in Live, to visualize non-audible frequencies. This is especially useful if you are mixing at low levels.
Step 2: Hi-hats
This 90s throwback energy hits hard with its dynamic percussion. Next, we’ll focus on layering the three hi-hats driving this track.
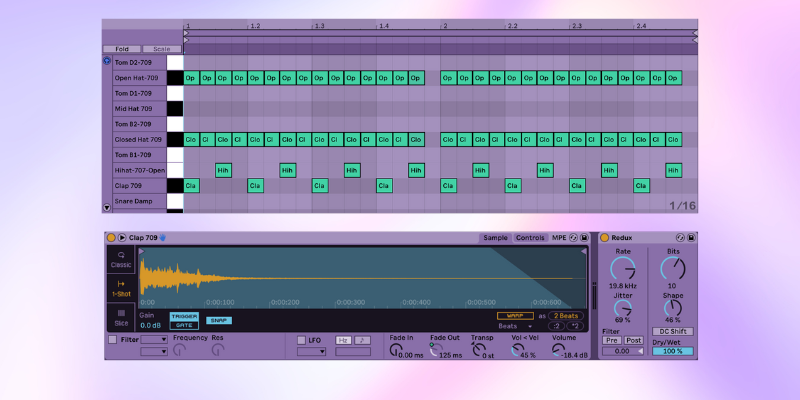
First, load a 709 Kit into a new MIDI track. Replace Snare A4-709 with Hihat-707-Open.adg. We’re
Now, recreate our two-bar pattern in the image below. Notice we’re laying a closed hi-hat and an open hat as a layered 16th rhythm with another open hi-hat programmed on every offbeat.

Expand the 709 Kit in Session View to refine the pattern and remove the choke on each instrument. By removing choke, we ensure we can hear the percussive elements.
Let’s refine it further. Tighten the Hihat-707-Open by trimming it to around the 0:00:250 mark. Now, add the Noise Drums audio effect vocoder. Set dry/wet to 37%. Bring in a utility and set the balance to 7R.
For Open-Hat-709 and Closed Hat 709 load up Utility and pan the balance to 34L.
💡Top Tip: Utility modules are versatile tools for your mix. Use them to control volume, widen stereo, or convert the low end to mono. This improves clarity, balance, and overall mix quality.
Step 3: Clap
With Clap 709, program a 4-beat clap pattern to hit on each beat of the bar. This will add texture and complement the kick. Additionally, apply the Redux effect with generous settings to give the clap an extra layer of noise.
Step 4: Snare
It’s common for snares to be on beat 2 and 4 of a bar. But Phase Fatale’s track uses a breakbeat pattern which is also popular and something we’ve covered previously. You can use a drum break, like the well oiled Amen Break, or you can program something to replicate its swing and energy – which is what we’re doing.
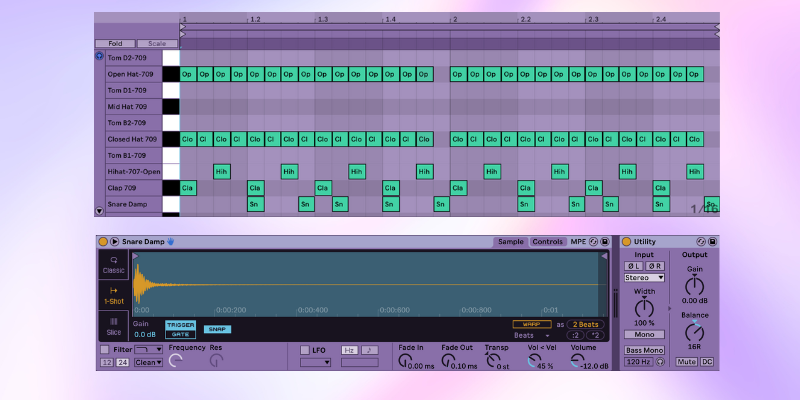
In our 709 Kit, swap out Snare A3-709 for Snare Damp and program the pattern below. It’s the same for both bars. The hits fall on each bar’s Steps 5, 8, 10, 13, and 16.
Now add a utility and set the balance to 16R. Simple right?
Step 5: Hi-hat & conga
Lets introduce a call-and-response using the hi-hat as the call and the conga as the response. The interplay helps add depth, tension, and release—elements commonly found in techno.
Create a new MIDI track and add the Shaker-DMX Drum Rack. Load the HiHat Closed Noise Soft sample onto D3. Pan the track to 7L.
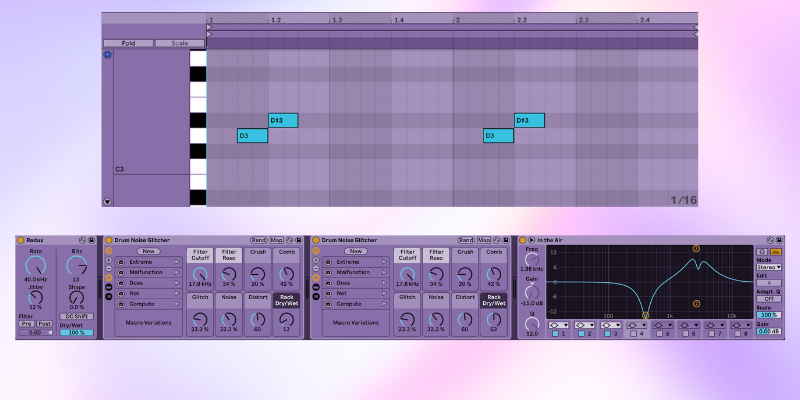
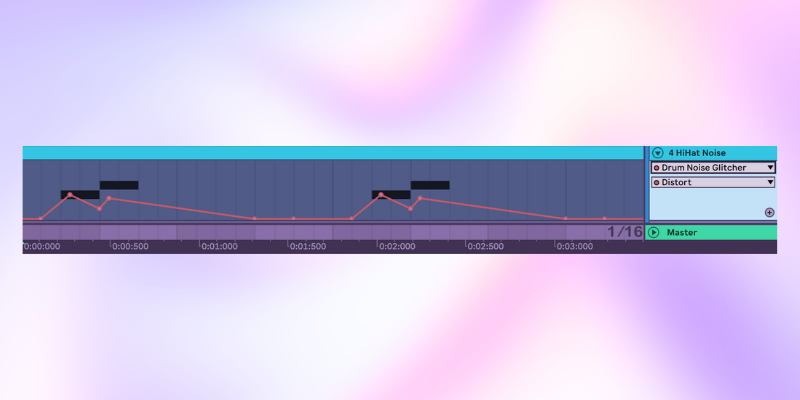
Let’s automate the call’s tail-end noise envelope! Switch to Arrangement View and select View, then Automation mode. On the same track, select Drum Noise Glitcher, and we’ll automate Distort. Draw something that works; we’re using the automation below.
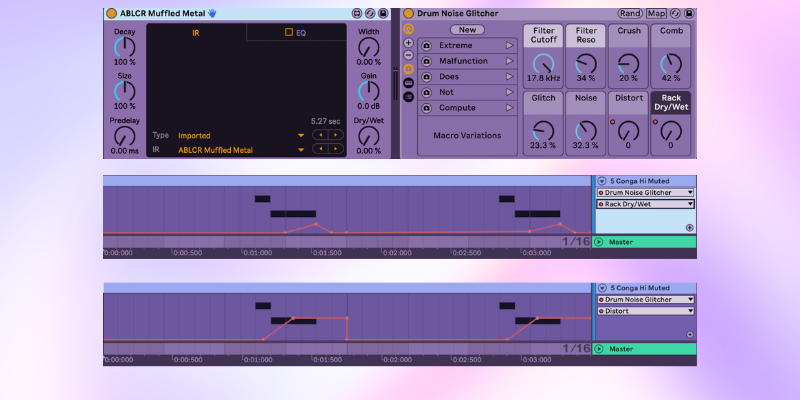
For our conga responce, create another MIDI track and add Conga Hi Muted. Pan the track to 10R.
Add the ABLCR Muffled Metal reverb and set it to 85% dry/wet, followed by a Drum Noise Glitcher.
For automation, we’re automating two parameters: Drum Noise Glitcher—Distort and Dry/Rack. Follow our settings below for similar results.
Now let’s group the tracks together and label it CallResponse to stay organized.
💡Top Tip: Group the conga and the hi-hat in Step 5 to keep your session organized.
Step 6: Mastering
Add the Master Wide & Warm compressor and set the comp (compression) dry/wet to 50%. This will level out our track but not smash the dynamic range too much, allowing the cycling elements to breathe.
Lastly, add a limiter. Adjust the lookahead to 6 ms to monitor for any peaks from the heavy kick we’ve built.
Vamp Acid is a music producer, live techno artist, host and curator of Hrdwre.io based in Berlin. Find Vamp Acid on Instagram.