
In this Synth Secrets, we’re using u-he’s Hive 2 to recreate a classic synth effect that’s been used for over 40 years across multiple genres.
Today, we will use u-he’s lovely Hive 2 to recreate a classic synth effect that’s been in circulation for more than 40 years, starting in a vintage rock tune and sampled in dozens of house and hip hop tracks.
The effect is heard at the very beginning of the Steve Miller Band’s Jungle Love and can be most recently spotted in the fresh house cut I Love It by Phil Greenwood featuring the late great Paul Johnson. During the second breakdown towards the end of the song.
The sound we’ll build:
And what it sounds like in context with a few Splice loops:
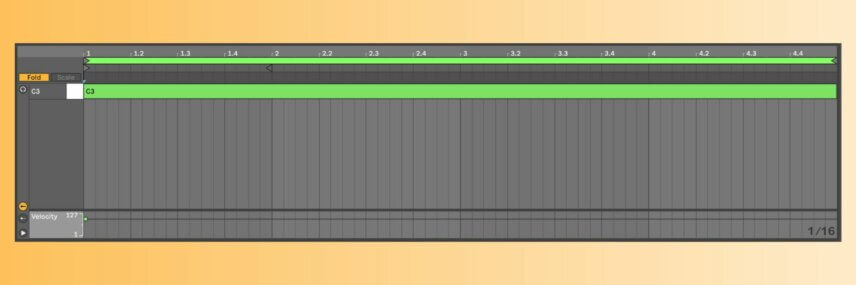
So set your DAW’s tempo to 126 BPM, create an instrument track with an instance of Hive on it, plug in the very simple MIDI clip below and let’s go.
Rather watch? Check it out on YouTube and make sure to subscribe to us over there also!
Download the session:
As ever, click any image to enlarge!
Step 1: First Touch
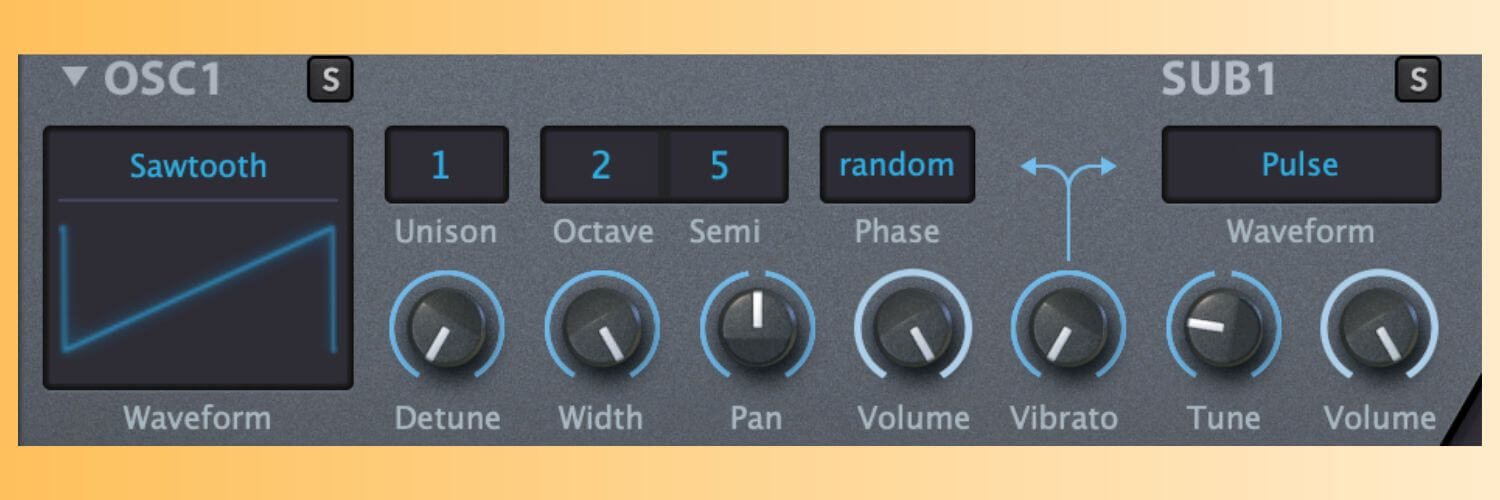
Start by right-clicking on Hive’s preset browser and hitting init to initialize the patch. Then we’ll move to the OSC1 section and pitch the oscillator up a bit by setting the Octave value to 2 and the Semi value to 5. That way, we’ll hit just the right pitch when we hit note C3. Leave the sawtooth wave as the selected waveform, and we’re off to a good start, not that you could tell based on how it sounds so far…!
Step 2: Filter Flex
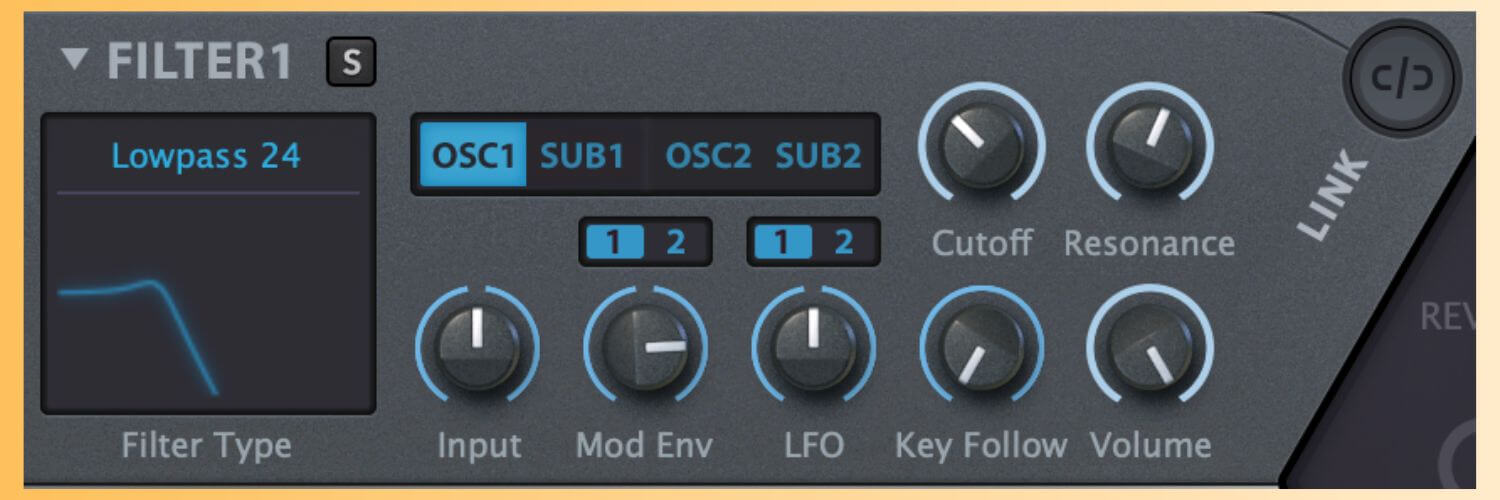
Next stop, filter 1. Pull the Cutoff down to about 10 o’clock, push the Resonance up to about 1 o’clock, and then turn Mod Env up to about 3 o’clock so we can make the cutoff change pretty drastically over time. It’s still not sounding much like where we’re going to land, but be patient, we’ll get there.
Step 3: Push the Envelope
Let’s move down to the envelope section and change some things up. We’ll start with AMP1. Move over to amplifier 1’s envelope section, pull sustain down just a touch, then push release up to about 60 percent so we get a nice long tail after releasing the key.
Then scoot over to MOD1 and crank decay up to something like 90 percent and release up to about 80 percent, pulling sustain down to about 50 percent as pictured. That will give modulation envelope 1 a long and evolving character.

Step 4: Stack the Layers
We’re going to layer in some white noise that will help give us that classic windy, sweeping effect that makes things work so well as risers or effects. We’ll use sub oscillator 2 for the task. Move over to the right side of Hive’s interface and route sub oscillator 2 through filter 2 by clicking SUB2 in the mixer section.
Change sub oscillator 2’s waveform from Pulse to White and pull the oscillator’s volume down to about 50 percent. Then, change the filter type from Lowpass 24 to Bandpass and pull the cutoff down to 0.
Now push the resonance up to about 10 o’clock and crank the Mod Env knob up to max. Now move down to MOD2, crank the envelope’s decay to max, and pull sustain to zero. Finally, pull filter 2’s Volume knob down to about 8 o’clock. It’s subtle but effective.

Step 5 – LFO magic
You’ve probably been wondering “when will this sound remotely like what we came here for,” and now is the time. We’ll start with LFO 1, obviously, so move over to LFO1 on the lower-left quadrant of Hive’s interface and change the shape from Triangle to Saw Down.
Set the Restart value to Sync and turn the Rate knob to 10 o’clock. Now we route LFO 1 to modulate oscillator 1’s pitch by dragging the crosshair to the Semi parameter on oscillator 1. Then, down in the mod matrix at the bottom of the interface, turn the strength of that modulation up to about 3 o’clock. Now we’re getting somewhere!
Step 6: LFO Magic part 2
But wait, there’s more.
Now we will use LFO 2 to alter the rate of LFO 1 and give us some real movement. Move over to LFO2, change the shape from Triangle to Saw Down, then move the Rate up to about 1 o’clock. Then set the Time Base value to 8/1 (which indicates that if the rate is set to default, the LFO will cycle once every eight bars).
Now drag the crosshair from LFO2 over to the Rate knob on LFO1. Set the strength of that modulation just shy of 3 o’clock down in the mod matrix.
Make another modulation routing, dragging LFO1’s crosshairs to the Pan knob on OSC1. Now turn the modulation strength in the mod matrix almost all the way to the left, giving us a nice left-to-right pan effect. Take a listen.

Let’s take a wide view of Hive to get a look at everything we just did.

Step 7: Essential Effects
What is a riser or transition effect without, uh, effects? Incomplete, that’s what it is. So we’ll fix that now.
Move to the center section of Hive and click FX to get a look at the effects engine. First we’re going to change the order of some effects, which is as simple as clicking and dragging the different blocks around.
Let’s grab DELAY and move it up in the chain, dropping it in right after the PHASER effect. Now activate delay by clicking on the block. Turn the LP knob down and the HP knob up so they’re both at about 10 o’clock.
Then move the feedback (Feedb) knob up to about 10 o’clock as well, pull Diffuse down to zero, and crank Mix up to about 12 o’clock for a 50/50 blend between the dry and wet signals. Set the delay values both to ⅛ and the mode to Stereo.

Step 8: Essential Effects Part 2
Here’s the icing on the cake. Activate the REVERB effect and move it down in the signal chain, dropping it right after DELAY. Activate it by clicking on its block—turn Size to 3 o’clock, Decay to 2 o’clock, and Tone up to 2 o’clock.
Then we’ll activate the compressor at the end of the chain by clicking on COMP, and we’ll turn Amount to 2 o’clock and Out down to about 10 o’clock just for a bit of extra emphasis on the reverb and delay effects and some extra output gain.

Remember you can apply these steps to any sound! So be creative!