
Dial in classic and surprisingly thick pads with the Roland Cloud Juno-106 emulation.
The Roland Juno-106 is a dance music production staple. It was a hit on its release in 1984, was rediscovered by house and techno producers in the 1990s, and remains a sought-after model on the vintage market.
Thanks to its surprisingly thick sound – that chorus is legendary for a reason – and bass boost in the highpass filter circuit, it’s graced classic after classic record, from the early days of Chicago house up to the present. The Roland Cloud Juno-106 emulation sounds just as good and even adds some parameters not found on the original.
Welsh superstars Overmono are known to have used the Roland JU-06A, a modern hardware recreation of the 106 and its older brother, the Juno-60, in their live performances. Today we’re using the Roland Cloud emulation of the 106 to craft some dance music pads inspired by ‘Good Lies’.
Remember, click any image to enlarge!
Here’s what we’re going for:
Step 1: Digitally Controlled Oscillations
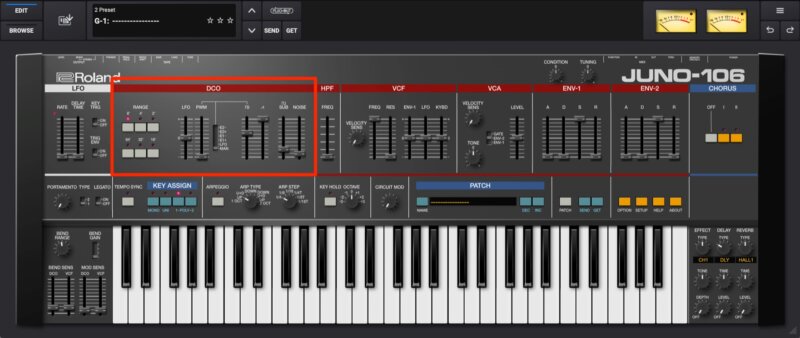
In your DAW, create a new MIDI track and add Roland Cloud Juno-106 to it. Make sure it’s initialized. Do this by selecting a blank patch. Choose the 8’ Range setting for the oscillator and then draw or play in some appropriate chords.
Let’s dial in the oscillator settings. The 106 originally had DCOs, not VCOs. The analog oscillators were set by a microchip to keep them from drifting out of tune. What this means in practice is a very clean, almost shiny sound. That is the trademark Juno tone.
Unlike some synths, the Juno-106 lets you combine waveforms for a thick sound. This helps you get around the fact that there’s only one oscillator. (The chorus will help too but that’s getting ahead of ourselves.)
Start by bringing up the sawtooth slider to full power. This will form the bulk of our pad. You can leave the square wave slider at the halfway position for additional harmonics. Finally, add in some sub oscillator for thickness and noise for texture.
The DCOs in full flight:
Step 2: Low Frequency Oscillations
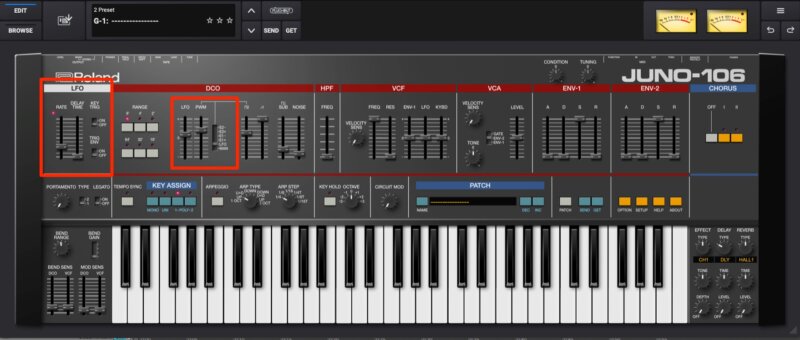
To keep our pad from sounding too static and sterile, let’s get the LFO involved. The 106 only had a single LFO and the Cloud version maintains this setup but it does let us assign the LFO to multiple destinations.
Start by bringing the LFO rate up about a quarter of the way for a laidback feel. Next, let’s assign it to the oscillator pitch to give it some loose vibrato. In the DCO section, raise the LFO slider just a hair. We want some subtle movement – anything more will sound seasick and woozy.
Finally, set the PWM (Pulse Width Modulation) to LFO and adjust the PWM slider to taste. This will cause the square wave duty cycle to oscillate slightly, adding an extra layer of motion.
The sound so far:
Step 3: Lowpass Filtering
Moving to the right across the synth’s panel, let’s take care of the filtering. The filter settings are very simple for this pad. Just bring up the Freq(uency) slider until it starts to fizz. You can automate the cutoff frequency to open over time as well.
With filtering:
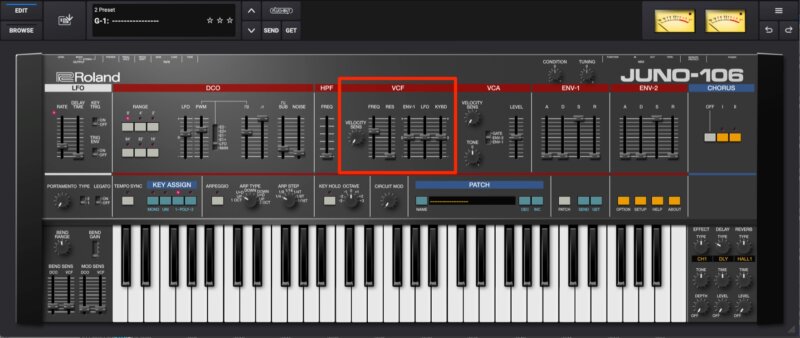
💡Try automating the cutoff frequency to open over time as well. Great for intro’s or breakdowns.
Step 4: Highpass Filtering
Next, turn to the HPF, or Highpass Filter. The non-resonant highpass filter is pretty standard on 1980s Roland analog polys. This serves two functions on the 106. One, you can remove unnecessary low frequencies as with an EQ. Two, it adds an additional layer of sound-shaping. As we’re dialing in a pad (and we want to leave room for the coming bassline) we don’t need any lows so push it all the way up.
Thinned out:
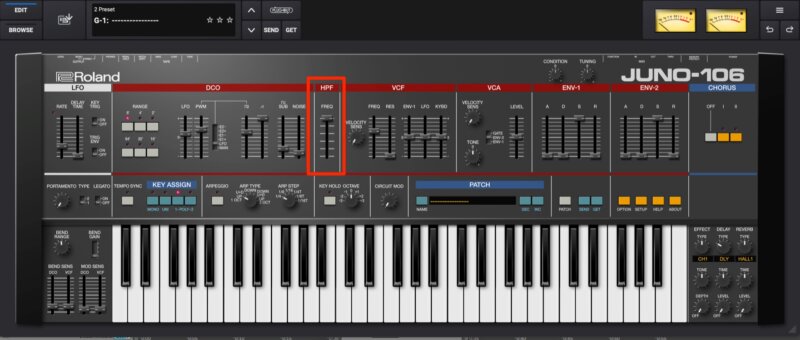
💡 Play with the highpass filter and hear how the tone changes in the mids and highs. It’s subtle but there is an effect.
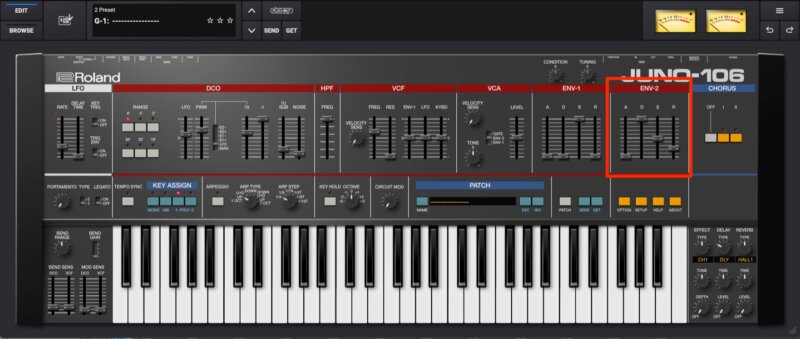
Step 5: Pushing the Envelope
Let’s take care of the amplitude envelope next. The Roland Cloud Juno-106 has two envelopes, one more than the original hardware. ENV-1 is hardwired to the filter, while ENV-2 handles amplitude duties. We’re not making any changes to the filter envelope so turn your attention to envelope 2.
Our sound is a pad, yes, but it has almost a sample-like envelope shape. This functions like a callback to classic dance music tracks, where producers often sampled notes and even chords from analog synths into samplers.
Accordingly, set the Attack on ENV-2 to zero. Next, bring the Decay up to the top, park Sustain at the halfway point and nudge the Release up until you get a nice spillover between notes.
Envelope involved:
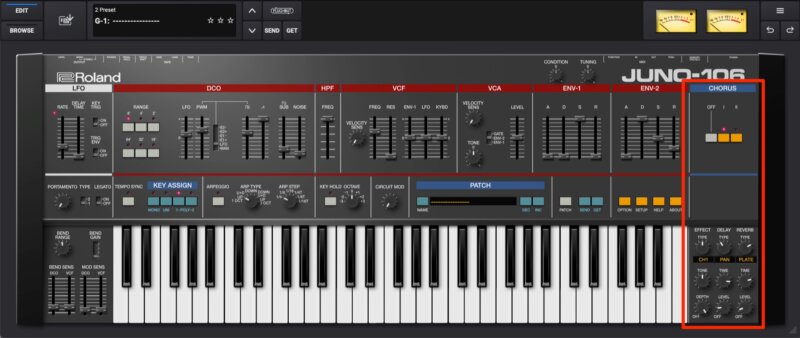
Step 6: Thickening the Sound with Chorus and Effects
Roland intended the Juno series (Juno-6/60 and 106) to be affordable alternatives to the Jupiter and JX lines. To keep costs down, they ended up with single oscillators. However, so the synths wouldn’t sound thin the engineers dropped in the now-famous Juno chorus circuit. It’s perfect for thickening up a sound, especially a pad.
In the Chorus section, choose setting I for a medium-speed LFO. This is duplicated in the Effect section below it. Try adding some Delay (the Pan Delay works well here) plus a Plate Reverb. We’re just thickening the sauce so don’t go too overboard. We’ll add more effects in the next step anyway.
Added chorus:
Step 7: Equalizing the Pad
For the final step, let’s clear away even more of the lower frequencies to make room for the bassline. Add an equalizer to the MIDI track after the plugin, such as the stock EQ 8 in Ableton Live. Roll away all of the frequencies below 1kHz with a low shelf.
Finally, drop in some additional plugins to help mix and produce the pad, such as saturation and panning.
The final pad:

Here’s the finished pad in the context of a song.
The finished track:
If you like this tutorial, you may enjoy this article: 10 Reasons The Juno Is The Greatest Synth Of All Time.
Find out more about Roland Cloud.